- Get link
- X
- Other Apps
- Get link
- X
- Other Apps
File GSTR-1 By Your Self
Hii Friends, In this topic we discuss how you can file GSTR-1 by yourself. Before filling GSTR-1 let's talk about GSTR-1. Is it important to file GSTR-1 or not? What is GSTR-1? Which types of documents are included in the GSTR-1? Which points are important for filing GSTR-1? And also discuss how we can file GSTR-1 Form by ourselves.
As usual, we know that every registered applicant is required to file the GSTR-1 for every month and every quarter. In GSTR-1 return carry all the outward supplies which are made through a particular tax period. In this outward supplies include all the B2B supplies and all the B2C supplies.
For filing GSTR-1 the due date is generally 11th of the next month (Before it was 10th of the next month until September 2018). This due date is only for the monthly applicant. And for the quarterly applicant due date is 13th of the next month.
For filling returns we have to go to the return dashboard on GST Portal.
Go to Services > Returns > Returns Dashboard
As we above discuss and we know that there are 2 different types for filing GSTR-1. At first, when we start filling returns they give some options that how you want to file your return during the year.
If you click on the 'yes' option then they again ask for that quarterly filing return.
After you select 'yes' then you should have to file the return quarterly. if you select 'no' then you should have to file the return monthly. After submitting your answer there is a show pop-up for filing your option.
After that, we redirect again to the return dashboard where we have to select the financial year, Quater, or return filling period.
Then select the return period you click on the search button. After the clicking on searching button we have an interface like as under :
Here we have given an option for filling GSTR-1 or GSTR-3B. Here we discuss filling GSTR-1 that's why we are clicking on GSTR-1.
We have 2 options first one is online and the second one is offline.
Here I will show you how we can file GSTR-1 with the offline method with help of Tally ERP-9 or Tally Prime Software. In Tally Software we can do all the data entry of any Partnership Firm, Company of Solo Proprietor Firm, etc.
After entries all outward supply data in Tally software. We have to open GSTR-1 details in Tally software. For opening the entire outward data of the company in Tally check the following steps :
Gateway of Tally > Display More Reports > GST Report > GSTR-1
In GSTR-1 of Tally software and GSTR-1 Portal is totally equal. As you can see that GSTR-1 of tally software and portal both are same and online they give some additional options.GSTR-1 Tally Prime View
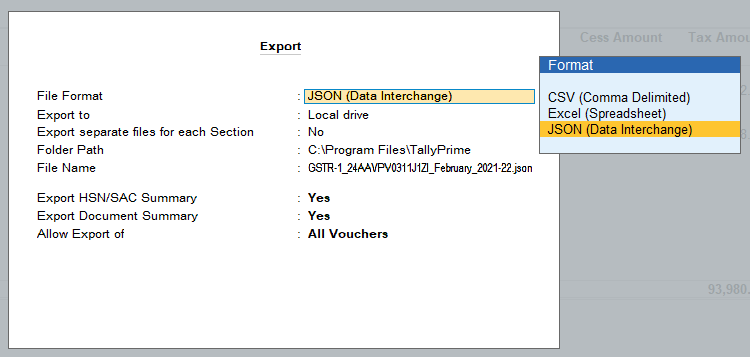
As we can see here that in tally software make it very easy for us for filing GSTR-1 report. In tally after we open GSTR-1 then we have to export the data for exporting data we can click on export otherwise we can press "ALT + E". and then select the E-Return then choose the file format is JSON file and also export the HSN or SAC summary and Document summary this both details is also important as much as other information.
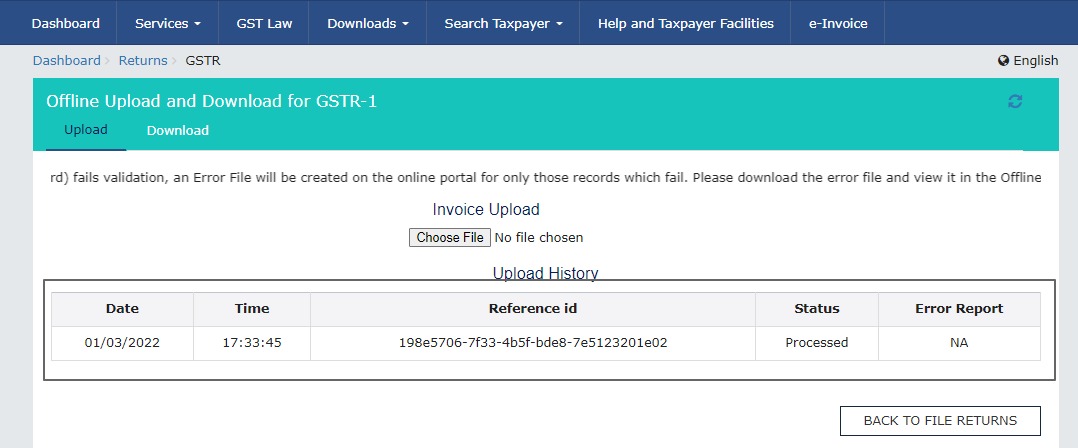
Then after exporting the file in JSON format we can upload the JSON file in Portal by clicking on "PREPARE OFFLINE" and selecting the JSON file and uploading the file.
After uploading data we can find that the data which was uploaded by us is 100% right data because the Error Report is 'N/A'. Then we again go to GSTR-1 and click on the view button and we can find that the data we can upload with help of tally is shown along with this their also shown HSN summary and Document summary which we can upload with data.
GSTR-1 GST Portal View
After completing all the processes we can click on the "Generate Summary" button to generate our GSTR-1 data.
Click on the check-box button to activate the "SUBMIT" button. Then we can submit the data. But before submitting data we must check the preview of data which we can be uploading and submit on the portal because if we submit the GSTR-1 before checking preview then we can't make any kind of change uploading data.
After clicking on submitting button as we know we can't change any data or we can't go back there is like one way from here you can't go back. Then we have to click on "FILE RETURN".
After that, we redirect to the final page of GSTR-1 where we can select the check-box button and activate "Authorised Signature" we have to select the proprietor name or authoriser of the company for final processing.
The last step for filing GSTR-1 is to select the one option the how we want to file return via "FILE WITH DSC" or "FILE WITH EVC". Generally, we can file with EVC after clicking on EVC OTP is sent on registered e-mail and mobile number.
After submitting OTP final pop-up is generated with a message "ARN will get on successful filling."
In this way, we can be filing GSTR-1 by ourselves. I hope you guys are following these steps to file your GSTR-1.
- Get link
- X
- Other Apps


Comments
Post a Comment